| 第 3 章 Docbook开发过程中的常见问题及解答 | ||
|---|---|---|
 |

|
|
| 第 3 章 Docbook开发过程中的常见问题及解答 | ||
|---|---|---|
|
|
|
|
目录
摘要
|
3.1. |
ValidationException: Property ID xxx previously used |
|||
javax.xml.transform.TransformerException: org.apache.fop.fo.ValidationException: Property ID "ref.ldr_syntax" (found on "fo:block") previously used; ID values must be unique within a document! (See position 1315:169) 很常见的问题,即源码中,某个id的值,和之前的重复了。 常出现于,从别处拷贝了某段代码,然后修改完毕后,残留部分内容,导致其中有重复的id 解决办法:将重复的id删除或者改名 |
||||
|
3.2. |
ValidationException: xxx is not a valid child of xxx |
|||
javax.xml.transform.TransformerException: org.apache.fop.fo.ValidationException: "{http://www.w3.org/1999/XSL/Format}list-item" is not a valid child of "fo:block"! (See position 345:1605)
错误的根本原因是:非正确地使用了某个标签。 比如某个元素不是另一个元素的子元素,但却由于不熟悉,而误用了。 但是具体的表现形式,那可能是多种多样的。 下面就简单列举一下,我所遇到过的错误的例子:
|
||||
|
3.3. |
ValidationException: xxx is missing child elements |
|||
org.apache.fop.apps.FOPException: org.apache.fop.fo.ValidationException: "fo:list-item-body" is missing child elements. Required content model: marker* (%block;)+ (See position 77:16747)
javax.xml.transform.TransformerException: org.apache.fop.fo.ValidationException: "fo:list-item-body" is missing child elements. Required content model: marker* (%block;)+ (See position 77:16747)
出现类似missing child elements的问题的话,从字面上就能看出,是说明某个关键字下面,缺少了某个必要的关键字 我遇到此问题,是因为就是折腾现在在用的这个qandaentry,结果在question下面,直接写上了内容,忘了加上para或screen等关键字,导致了始终此错误。 所以遇到此类问题的话,请自行去找找,是不是也对于某个关键字,漏了其下某个必须的关键字。 关于具体是哪个关键字出的问题,就要靠你自己调试,定位找到问题所在了。 而关于是其下缺少了哪个关键字,则是可以去DocBook: The Definitive Guide去找到对应关键字,看其语法的定义了。 比如对于我这里的question,其语法是
question ::=
(label?,
 (calloutlist|glosslist|bibliolist|itemizedlist|orderedlist|
  segmentedlist|simplelist|variablelist|caution|important|note|
  tip|warning|literallayout|programlisting|programlistingco|
  screen|screenco|screenshot|synopsis|cmdsynopsis|funcsynopsis|
  classsynopsis|fieldsynopsis|constructorsynopsis|
  destructorsynopsis|methodsynopsis|formalpara|para|simpara|
  address|blockquote|graphic|graphicco|mediaobject|mediaobjectco|
  informalequation|informalexample|informalfigure|informaltable|
  equation|example|figure|table|procedure|anchor|bridgehead|
  remark|highlights|indexterm)+)
该加号'+'表示至少有1个(或更多),所以,此处就是缺少了任何一个,才出现错误的。加上合适的,比如我此处是代码,需要一个screen,即可解决问题了。 解决办法:找到对应出错的关键字,添加必要的子(child)关键字 |
||||
|
3.4. |
docbook5中指定表格table中列column的宽度 |
|||
|
解决办法:在table的tgroup之后,添加对应的colspec,指定对应的colwidth,即可达到自定义表格中列的宽度。示例代码如下:
<table><title id="mpeg.header_format">MPEG音频的帧头的格式</title>
    <tgroup cols="4">
        <colspec colnum="1" colname="col1" colwidth="1*"/>
        <colspec colnum="2" colname="col2" colwidth="1*"/>
        <colspec colnum="3" colname="col3" colwidth="6*"/>
        <colspec colnum="4" colname="col4" colwidth="2*"/>

        <thead>
            <row><entry>位置(bit)</entry><entry>长度(bit)</entry><entry>含义</entry><entry>示例</entry></row>
        </thead>

        <tbody>
            <row><entry>0</entry><entry>11</entry><entry>用于同步帧,找到此帧头(所有位均置1)</entry><entry>1111 1111 111</entry></row>
            ......
      </tbody>
    </tgroup>
</table>
|
||||
|
3.5. |
除了章(Chapter)有编号之外,其他不同层级的小节(section)都是没有编号的,想要给各小节添加索引编号 |
|||
|
解决办法:设置section.autolabel为1和section.label.includes.component.label为1,即可。 即给xsltproc添加参数: --stringparam section.autolabel 1 --stringparam section.label.includes.component.label 1 或者通过给xsl文件中添加对应参数:
<xsl:param name="section.autolabel" select="1"/>
<xsl:param name="section.label.includes.component.label" select="1"/>
也可以达到同样效果。 |
||||
|
3.6. |
已经include了xsl配置文件了,但是自己添加的参数配置,不起效果 |
|||
|
原因:很可能是xsl的import和include没搞清楚,使用了include,导致后续设置的参数,没有起效 解决办法:将<xsl:include href="xxx.xsl"/>改改为<xsl:import href="docbook.xsl"/>即可。 |
||||
|
3.7. |
xsltproc出错:Element xxx in namespace xxx encountered in book, but no template matches |
|||
|
此错误有两种类型:
解决办法:综合两种类型,给出可以使用的示例代码: 主文件,比如docbook_dev_note.xml中,如下:
<?xml version='1.0' encoding="utf-8"?>

<book version="5.0"
    xmlns="http://docbook.org/ns/docbook"
    xmlns:xi="http://www.w3.org/2001/XInclude"
    xmlns:xl="http://www.w3.org/1999/xlink"
    xml:lang="zh_CN"
    >

<info>
    <title>Docbook开发手记</title>
    <subtitle></subtitle>
    <revhistory>...</revhistory>
    <pubdate>2012-06-01</pubdate>
    <copyright>
        <year>2012</year>
        <holder>Crifan</holder>
        <holder><link xl:href="http://crifan.com" /></holder>
    </copyright>
    <legalnotice>...</legalnotice>
</info>

<xi:include href="preface.xml" />
<xi:include href="ch01_build_env.xml" />
<xi:include href="appendix.xml" />

</book>
每个单独的分割的xml文件中,如下:
<?xml version='1.0' encoding="utf-8"?>

<chapter
    xmlns="http://docbook.org/ns/docbook"
    xmlns:xi="http://www.w3.org/2001/XInclude"
    xmlns:xl="http://www.w3.org/1999/xlink"

    xml:id="ch01_build_env"
    >

<title>xxx</title>
    <sect1><title>xxx</title>
        <sect2><title>yyy</title>
            <para>xxx</para>
        </sect2>
...
    </sect1>

    <para>xxx</para>
</chapter>
然后在使用xsltproc处理xml的时候,记得加上参数 详情参考【已解决】docbook中使用xsltproc出错:Element xxx in namespace xxx encountered in book, but no template matches |
||||
|
3.8. |
pdf中没有出现/显示revhistory所对应的历史版本 |
|||
|
原因:对应的stylesheet配置文件 解决办法:编辑
<t:titlepage t:element="book" t:wrapper="fo:block">
<t:titlepage-content t:side="recto">
...
<author font-size="&hsize3;"
space-before="&hsize2space;"
keep-with-next.within-column="always"/>
<!-- If you add editor, include this t:predicate attribute
because only the first editor generates the list of editors.
<editor t:predicate="[position() = 1]"/>
-->
<abstract text-align="left"
space-before="&hsize5space;"/>
<revhistory
然后将其另存为titlepage.templates_crl.xml,放在当前文件夹下。 再用如下命令去编译出相应的xsl文件: xsltproc --output titlepage.templates_crls.xsl 这样,就可以生成相应的
<xsl:import href="titlepage.templates_crl.xsl"/>
用此配置编出来的pdf,就可以保护对应的revhistory部分的内容了。 详情参考【已解决】docbook中pdf中没有出现/显示revhistory所对应的历史版本 关于这个问题,多说几句: revhistory问题,同样也是releaseinfo所遇到的,默认pdf中都没有包含。 在mailing list中看到别人在2005年的时候,就讨论到此问题,默认pdf中没有releaseinfo: <releaseinfo> missing from fo book titlepage template? 而相关的开发人员Michael Smith也回复说,以后会添加此功能,结果我现在2012年了,用的fop 1.0 + docbook-xsl-ns-1.76.1,其中默认配置所输出的pdf中,也还是没把releaseinfo添加进来的。 而同样的问题,也出现在revhistory,默认输出的pdf中,是没有的。而默认输出的HTML中就有。 对此问题,即便是为了官网在解释如何定制化titlepage的教程中,把revhistory当做例子来解释,但是如此常用的功能,也应该在pdf输出中,像HTML输出一样,把其加入进来,否则对于多数使用者,在源码中写了revhistory和releaseinfo,结果输出的HTML中有,PDF中却没有,肯定会造成现在所已经出现的问题,就是大家都以为这个问题是个bug,所以google也能搜到一堆这类问题。 最新的结果是,新出的docbook-xsl-ns-1.77.0中,也还是没有把revhistory和releaseinfo包含进来,真是无语。。。 |
||||
|
3.9. |
生成pdf的时候出错:严重: Image not found. URI: xxx.png. (See position xxx) |
|||
|
原因:从问题本质上说,在图片存在的前提下,都是图片路径不正确。 但是对于为何图片路径不正确,至少有两种类型错误:
|
||||
|
3.10. |
想要给book中的标题下面添加一个版本号 |
|||
|
没有找到专门的元素。暂时先借用releaseinfo来实现放此版本号等内容。 |
||||
|
3.11. |
输出的pdf中的revhistory历史版本的内容中的表格无边框,想要添加边框 |
|||
|
解决办法:添加如下配置:
<!--<xsl:import href="titlepage_crl.xsl"/> -->

<xsl:attribute-set name="revhistory.title.properties">
  <xsl:attribute name="font-size">12pt</xsl:attribute>
  <xsl:attribute name="font-family">
    <xsl:value-of select="$title.fontset"/>
  </xsl:attribute>
  <xsl:attribute name="text-align">left</xsl:attribute>
</xsl:attribute-set>

<xsl:attribute-set name="revhistory.table.properties">
  <xsl:attribute name="border">0.5pt solid black</xsl:attribute>
  <xsl:attribute name="width">50%</xsl:attribute>
</xsl:attribute-set>

<xsl:attribute-set name="revhistory.table.cell.properties">
  <xsl:attribute name="border">0.5pt solid black</xsl:attribute>
  <xsl:attribute name="font-size">9pt</xsl:attribute>
  <xsl:attribute name="padding">4pt</xsl:attribute>
</xsl:attribute-set>
|
||||
|
3.12. |
如何去掉docbook中输出的pdf中,除了带链接的文字之外的那个链接地址 |
|||
|
原因:PDF配置中,默认开启了ulink.show,所以会导致链接的地址,也同链接的文字同步显示出来。 解决办法:设置ulink.show为0即可。 给xsltproc传递参数 –-stringparam ulink.show 0 或者添加如下配置:
<xsl:param name="ulink.show" select="0"/>
|
||||
|
3.13. |
给docbook生成的pdf中的带链接的文字,添加下划线和设置字体颜色为蓝色 |
|||
|
解决办法:添加如下配置:
<xsl:attribute-set name="xref.properties">
  <xsl:attribute name="color">blue</xsl:attribute>
  <xsl:attribute name="text-decoration">underline</xsl:attribute>
</xsl:attribute-set>
|
||||
|
3.14. |
如何给docbook的pdf添加bookmark书签的功能 |
|||
|
解决办法: 添加如下配置:
<xsl:param name="fop1.extensions">1</xsl:param>
详情参考【顺带实现】给docbook的pdf添加bookmark书签的功能 更多的关于fop1.extensions的解释,可以去看:Installing an XSL-FO processor和fop1.extensions |
||||
|
3.15. |
Docbook的pdf,去除正文对于标题的缩进indent |
|||
|
解决办法: 添加如下配置:
<xsl:param name="body.start.indent">0pt</xsl:param>
|
||||
|
3.16. |
生成的pdf中emphasis无效果,想要实现给pdf中emphasis的文字加粗或斜体 |
|||
|
原因:由于当前使用的是中文字体,中文字体没有对应的粗体和斜体,所以无效果。 与此相对的是,很多英文字体,是有对应的粗体或斜体的,所以会有效果。 而其他word等文字处理软件中,中文字体也有粗体和斜体的效果,只是相应软件处理生成出来的效果。 解决办法:此处想要给emphasis的文字的颜色设置为brown 主要就是修改inline.italicseq和inline.boldseq的部分,把相应的font-style="italic"和font-weight="bold"都改为color="brown"即可。 即添加如下配置:
<!--============================================================================
emphasis setting
=============================================================================-->
<!-- copy from docbook-xsl-ns-1.77.0\fo\inline.xsl -->
<xsl:template name="inline.italicseq">
<xsl:param name="content">
<xsl:call-template name="simple.xlink">
<xsl:with-param name="content">
<xsl:apply-templates/>
</xsl:with-param>
</xsl:call-template>
</xsl:param>
<!-- changed by crifan start -->
<!-- <fo:inline font-style="italic"> -->
<fo:inline color="brown">
<!-- changed by crifan end -->
<xsl:call-template name="anchor"/>
<xsl:if test="@dir">
<xsl:attribute name="direction">
<xsl:choose>
<xsl:when test="@dir = 'ltr' or @dir = 'lro'">ltr</xsl:when>
<xsl:otherwise>rtl</xsl:otherwise>
</xsl:choose>
</xsl:attribute>
</xsl:if>
<xsl:copy-of select="$content"/>
</fo:inline>
</xsl:template>
<xsl:template name="inline.boldseq">
<xsl:param name="content">
<xsl:call-template name="simple.xlink">
<xsl:with-param name="content">
<xsl:apply-templates/>
</xsl:with-param>
</xsl:call-template>
</xsl:param>
<!-- changed by crifan start -->
<!-- <fo:inline font-weight="bold"> -->
<fo:inline color="brown">
<!-- changed by crifan end -->
<xsl:if test="@dir">
<xsl:attribute name="direction">
<xsl:choose>
<xsl:when test="@dir = 'ltr' or @dir = 'lro'">ltr</xsl:when>
<xsl:otherwise>rtl</xsl:otherwise>
</xsl:choose>
</xsl:attribute>
</xsl:if>
<xsl:copy-of select="$content"/>
</fo:inline>
</xsl:template>
|
||||
|
3.17. |
如何给(docbook中的)xsl中定义实体Entity |
|||
|
解决办法:参考如下中的xsl_ns_base_cygwin如何定义的,即可:
<?xml version='1.0'?>
<!DOCTYPE stylesheet
[
<!ENTITY xsl_ns_base_cygwin "/home/develop/docbook/tools_root/docbook-xsl-ns-1.77.0">
]
>
<xsl:stylesheet xmlns:xsl="http://www.w3.org/1999/XSL/Transform"
                version='1.0'>
<xsl:import href="&xsl_ns_base_cygwin;/html/docbook.xsl"/>
<xsl:import href="../common_html.xsl"/>
</xsl:stylesheet>
|
||||
|
3.18. |
给docbook的pdf中的等式(equation)设置背景色 |
|||
|
解决办法: 添加如下配置:
<xsl:attribute-set name="equation.properties" use-attribute-sets="formal.object.properties">
    <xsl:attribute name="border-style">solid</xsl:attribute>
    <xsl:attribute name="border-width">0.5pt</xsl:attribute>
    <xsl:attribute name="background-color">silver</xsl:attribute>
</xsl:attribute-set>
|
||||
|
3.19. |
如何将默认的输出单个的HTML页面,改为输入多个HTML页面? |
|||
|
解决办法:将之前引用html的docbook.xsl换为chunk.xsl即可。 |
||||
|
3.20. |
如何给docbook中的表格(table)的第一行(firstrow或thead)添加背景色? |
|||
|
解决办法: 添加如下配置:
<!--============================================================================
table setting
=============================================================================-->
<!-- copy from docbook-xsl-ns-1.76.1\fo\table.xsl -->
<!-- Expand this template to add properties to any fo:table-cell -->
<xsl:template name="table.cell.properties">
<xsl:param name="bgcolor.pi" select="''"/>
<xsl:param name="rowsep.inherit" select="1"/>
<xsl:param name="colsep.inherit" select="1"/>
<xsl:param name="col" select="1"/>
<xsl:param name="valign.inherit" select="''"/>
<xsl:param name="align.inherit" select="''"/>
<xsl:param name="char.inherit" select="''"/>
<xsl:choose>
<xsl:when test="ancestor::d:tgroup">
<!-- added by crifan start -->
<xsl:if test="ancestor::d:thead">
<xsl:attribute name="background-color">antiquewhite</xsl:attribute>
</xsl:if>
<!-- added by crifan end -->
<xsl:if test="$bgcolor.pi != ''">
<xsl:attribute name="background-color">
<xsl:value-of select="$bgcolor.pi"/>
</xsl:attribute>
</xsl:if>
<xsl:if test="$rowsep.inherit > 0">
<xsl:call-template name="border">
<xsl:with-param name="side" select="'bottom'"/>
</xsl:call-template>
</xsl:if>
<xsl:if test="$colsep.inherit > 0 and
$col < (ancestor::d:tgroup/@cols|ancestor::d:entrytbl/@cols)[last()]">
<xsl:call-template name="border">
<xsl:with-param name="side" select="'end'"/>
</xsl:call-template>
</xsl:if>
<xsl:if test="$valign.inherit != ''">
<xsl:attribute name="display-align">
<xsl:choose>
<xsl:when test="$valign.inherit='top'">before</xsl:when>
<xsl:when test="$valign.inherit='middle'">center</xsl:when>
<xsl:when test="$valign.inherit='bottom'">after</xsl:when>
<xsl:otherwise>
<xsl:message>
<xsl:text>Unexpected valign value: </xsl:text>
<xsl:value-of select="$valign.inherit"/>
<xsl:text>, center used.</xsl:text>
</xsl:message>
<xsl:text>center</xsl:text>
</xsl:otherwise>
</xsl:choose>
</xsl:attribute>
</xsl:if>
<xsl:choose>
<xsl:when test="$align.inherit = 'char' and $char.inherit != ''">
<xsl:attribute name="text-align">
<xsl:value-of select="$char.inherit"/>
</xsl:attribute>
</xsl:when>
<xsl:when test="$align.inherit != ''">
<xsl:attribute name="text-align">
<xsl:value-of select="$align.inherit"/>
</xsl:attribute>
</xsl:when>
</xsl:choose>
</xsl:when>
<xsl:otherwise>
<!-- HTML table -->
<xsl:if test="$bgcolor.pi != ''">
<xsl:attribute name="background-color">
<xsl:value-of select="$bgcolor.pi"/>
</xsl:attribute>
</xsl:if>
<xsl:if test="$align.inherit != ''">
<xsl:attribute name="text-align">
<xsl:value-of select="$align.inherit"/>
</xsl:attribute>
</xsl:if>
<xsl:if test="$valign.inherit != ''">
<xsl:attribute name="display-align">
<xsl:choose>
<xsl:when test="$valign.inherit='top'">before</xsl:when>
<xsl:when test="$valign.inherit='middle'">center</xsl:when>
<xsl:when test="$valign.inherit='bottom'">after</xsl:when>
<xsl:otherwise>
<xsl:message>
<xsl:text>Unexpected valign value: </xsl:text>
<xsl:value-of select="$valign.inherit"/>
<xsl:text>, center used.</xsl:text>
</xsl:message>
<xsl:text>center</xsl:text>
</xsl:otherwise>
</xsl:choose>
</xsl:attribute>
</xsl:if>
<xsl:call-template name="html.table.cell.rules"/>
</xsl:otherwise>
</xsl:choose>
</xsl:template>
|
||||
|
3.21. |
如何用docbook生成chm(微软帮助文件)? |
|||
|
解决办法: 总的逻辑是:使用htmlhelp.xsl生成相关的HTML文件和一个总的配置文件htmlhelp.hhp,再用微软的工具hhc去将htmlhelp.hhp转换为对应的chm文件。 当然,使用htmlhelp.xsl的时候,别忘了加上自己的配置,我的配置如下:
<?xml version='1.0'?>

<!DOCTYPE stylesheet
[
<!ENTITY xsl_ns_base_cygwin "/home/CLi/develop/docbook/tools/docbook-xsl-ns-1.76.1">
]
>

<xsl:stylesheet xmlns:xsl="http://www.w3.org/1999/XSL/Transform"
                version='1.0'>

<xsl:import href="&xsl_ns_base_cygwin;/htmlhelp/htmlhelp.xsl"/>

<xsl:output
            encoding="UTF-8"
            indent="no"/>

<xsl:param name="title.font.family">msyhbd</xsl:param>
<xsl:param name="body.font.family">msyh</xsl:param>
<xsl:param name="monospace.font.family">msyh</xsl:param>

</xsl:stylesheet>
然后用: xsltproc --xinclude -o MPEG_VBR.html docbook_htmlhelp_crl.xsl MPEG_VBR.xml 生成对应的HTML文件和htmlhelp.hhp 然后再去下载HTML Help Wordshop并安装。 然后用 hhc htmlhelp.hhp 去生成对应的chm |
||||
|
3.22. |
docbook生成的chm的左边目录等内容都是乱码 |
|||
|
原因:主要是由于微软的hhc对UTF-8编码支持不好,导致会出现乱码。 解决办法:确保本身输出的HTML都是UTF-8编码:
<xsl:param name="htmlhelp.encoding">UTF-8</xsl:param>
<xsl:param name="chunker.output.encoding">UTF-8</xsl:param>
然后再用iconv将UTF-8转换为GB18030(因为我的本地系统是中文的GBK,而GB18030是GBK的超集,使用GB18030比GBK更好,可以支持更多的字符)
iconv -f UTF-8 -t GB18030 < ../output/htmlhelp/htmlhelp.hhp > ../output/htmlhelp/htmlhelp_gb18030.hhp
mv ../output/htmlhelp/htmlhelp_gb18030.hhp ../output/htmlhelp/htmlhelp.hhp

iconv -f UTF-8 -t GB18030 < ../output/htmlhelp/toc.hhc > ../output/htmlhelp/toc_gb18030.hhc
mv ../output/htmlhelp/toc_gb18030.hhc ../output/htmlhelp/toc.hhc
最后再用hhc去处理,就可以了: hhc htmlhelp.hhp |
||||
|
3.23. |
如何将qanda的标题添加到TOC目录中去? |
|||
|
解决办法:设置qanda.in.toc为1即可:
<xsl:param name="qanda.in.toc">1</xsl:param>
更多的解释,请参考:Q and A in table of contents |
||||
|
3.24. |
如何将docbook转换为(和word兼容的)RTF文档? |
|||
|
解决办法:先用xsltproc转换xml为fo,然后再用fop将fo转换为rtf: fop -c fop.xconf MPEG_VBR.fo -rtf MPEG_VBR.rtf 详情参考【记录】将docbook的xml源码,通过xsltproc和FOP生成(可用word打开的)RTF(Word兼容)格式
|
||||
|
3.25. |
如何用Docbook生成Webhelp? |
|||
|
解决办法:使用webhelp.xsl即可。不过偶目前暂时还没折腾出来。有空再去弄。 |
||||
|
3.26. |
用fop生成pdf过程中出现警告:warning: Font "Symbol,normal,700" not found. Substituting with "Symbol,normal,400" |
|||
|
解决办法: 如果只是想要去除此警告,那么可以加上此配置即可:
<xsl:param name="symbol.font.family"></xsl:param>
|
||||
|
3.27. |
Docbook中使用fop过程中出错:严重: Couldn’t find hyphenation pattern zh_cn |
|||
|
解决办法:虽然有此提示,但是实际上中文的断字,基本上已经很好了。至少我这里这么多的book,都没有出现之前别人遇到的,中文的标点符号,偶尔会在句首出现的问题。 但是的确好像对于中文的hyphenation,没有官方的支持的。只有en等英语的支持。 总的来说,就一句话,暂时可以忽略此“严重”型的警告,生成的pdf中的中文的显示,都还是正常的。 详情参考:【部分解决】Docbook中使用fop过程中出错:严重: Couldn’t find hyphenation pattern zh_cn |
||||
|
3.28. |
cygwin/linux下的fop运行出错:Exception in thread "main" java.lang.NoClassDefFoundError: org/apache/xmlgraphics/image/loader/ImageContext |
|||
|
原因:fop中所用到的cygpath有bug,导致不很好的支持windows中关于CLASS_PATH的定义,最终导致转换出来的路径出错,无法找到相应的各种的java的库 解决办法:修改fop文件,将(大概是189行的):
LCP_TEMP=`cygpath --path --unix "$LOCALCLASSPATH"`
改为:
#LCP_TEMP=`cygpath --path --unix "$LOCALCLASSPATH"`
# for cygpath has bug, so use follow workaround
# edit by admin AT crifan DOT com
LCP_TEMP=`cygpath --path --$format "$LOCALCLASSPATH"`
LCP_TEMP=`cygpath --path --unix "$LCP_TEMP"`
|
||||
|
3.29. |
Docbook中用xsltproc生成HTML过程中出错:runtime error xxx/chunker.xsl line 226 element document, invalid value for indent,xsltRunStylesheet : run failed |
|||
|
原因:有些参数的值,是字符串,所以如果没有用单引号括起来,则会导致参数赋值出错。 解决办法:将原先的参数赋值中的字符串类型的值,加上单引号。即,把:
<xsl:param name="chunker.output.indent" select="yes"/>
改为:
<xsl:param name="chunker.output.indent" select="'yes'"/>
|
||||
|
3.30. |
docbook的xsltproc生成的HTML中Charset的值是空的,不是所设置的UTF-8 |
|||
|
原因:同问: 3.29 解决办法:把
<xsl:param name="chunker.output.encoding" select="UTF-8"/>
改为:
<xsl:param name="chunker.output.encoding" select="'UTF-8'"/>
|
||||
|
3.31. |
如何给Docbook中添加abbrev缩略词一项,且放置在目录之后,正文之前? |
|||
|
解决办法:单独写一个glossary.xml,其中内容如下:
<?xml version='1.0' encoding="utf-8"?>

<glossary xmlns="http://docbook.org/ns/docbook"
    xml:id="glossary"
    xmlns:xi="http://www.w3.org/2001/XInclude">
<title>缩略词</title>

<glossentry id="ASE"><glossterm>ASE</glossterm>
    <acronym>ASE</acronym>
    <glossdef>
      <para>Application Specific Extension</para>
      <para>(根据应用的)专用扩展</para>
    </glossdef>
</glossentry>

<glossentry id="xxx"><glossterm>xxx</glossterm>
    <acronym>xxx</acronym>
    <glossdef>
      <para>xxx</para>
      <para>xxx</para>
    </glossdef>
</glossentry>

</glossary>
然后将把glossary部分源码放到bookinfo之后,XInclude其他各个章节之前:
<?xml version='1.0' encoding="utf-8"?>

<book version="5.0" ... >

<bookinfo>
    <title>ARM与MIPS的详细对比</title>
    <subtitle></subtitle>
...
</bookinfo>
<xi:include href="glossary.xml"/>
<xi:include href="ch01_reduced_instruction_set.xml"/>
...
</book>
详情参考【已解决】给Docbook中添加缩略词 + 自动链接到缩略词表项 + 将缩略词单独放置一页,且位于目录之后,正文之前 |
||||
|
3.32. |
给Docbook的HTML的等式(equation),程序源码(programlisting)等添加背景色 |
|||
|
解决办法:添加相应的css文件,其配置如下:
/*
 * about html color and corresponding name  can refer:
 * http://www.w3schools.com/html/html_colornames.asp
 */

/* programlisting */
pre.programlisting {
/* background-color: #F4F4F4 ; */
  background-color: Lavender ;
  border: 1px solid #006600 ;
}

/* screen */
pre.screen {
/* background-color: #F4F4F4 ; */
  background-color: Lavender ;
  border: 1px solid #006600 ;
}

/* equation */
div.equation {
/* background-color: #F4F4F4 ; */
  background-color: Lavender ;
  border: 1px solid #006600 ;
}


/* table */
/* thead=table header */
thead {
  background-color: antiquewhite ;
}

/* QandA: Question and Answer */
tr.question
{
  background-color: antiquewhite ;
}
|
||||
|
3.33. |
PDF中和HTML中的图片显示,始终不能统一,要么HTML中是放大的,要么PDF中不能完全显示,所以希望PDF和HTML中的图片显示可以用同一套代码来统一 |
|||
|
解决办法:参考如下代码: 对于多数的,尺寸大于pdf中页面宽度(大概是500左右的像素)的图片,则使用pdf中设置为自动缩放:
<figure><title>Nand Flash的结构图</title>
    <mediaobject>
        <imageobject role="html">
            <imagedata fileref="images/nand_flash_layout.png" align="center" scalefit="0" width="100%" />
        </imageobject>
        <imageobject role="fo">
            <imagedata fileref="images/nand_flash_layout.png" align="center" scalefit="1" width="100%"/>
        </imageobject>
    </mediaobject>
</figure>
对于多数的,尺寸小于pdf中页面宽度的图片,则使用pdf中设置为禁止自动缩放,并且自行调节显示的比例:
<figure><title>典型的Flash内存单元的物理结构</title>
    <mediaobject>
        <imageobject role="html">
            <imagedata fileref="images/flash_cell_structure.jpg" align="center" scalefit="0" width="100%" />
        </imageobject>
        <imageobject role="fo">
            <imagedata fileref="images/flash_cell_structure.jpg" align="center" scalefit="0" width="80%"/>
        </imageobject>
    </mediaobject>
</figure>
|
||||
|
3.34. |
想要设置HTML和PDF中的图片的标题都是居中对齐 |
|||
|
解决办法:
|
||||
|
3.35. |
生成PDF中,程序代码programlisting中单行代码太长,超出页面宽度,无法显示 |
|||
|
解决办法:添加设置
<xsl:attribute-set name="monospace.verbatim.properties">
    <xsl:attribute name="wrap-option">wrap</xsl:attribute>
</xsl:attribute-set>
详情参考【已解决】Docbook生成PDF中,程序代码programlisting中单行代码太长,超出页面宽度,无法显示 |
||||
|
3.36. |
Docbook生成的pdf中,当表格在quote中时,表格头部却在底端显示,而且如果内容是多行的,还会显示出多行 |
|||
|
原因:是自己误用了quote所导致的。 解决办法:对于block类型的内容,如table等,应该使用blockquote而不是quote。 详情参考【已解决】Docbook生成的pdf中,当表格在quote中时,表格头部却在底端显示,而且如果内容是多行的,还会显示出多行 |
||||
|
3.37. |
Docbook中的callout图片在programlisting中不显示 |
|||
|
原因:参考的代码是官方的,其用的是areaspec,但是xsltproc不支持areaspec,所以programlisting中不显示callout图片 解决办法:使用co,放到代码中对应位置即可。可参考如下代码:
<programlistingco>
...
chip->cmdfunc(mtd, NAND_CMD_READ0, 0x00, page); <co id="co.cmdfunc" linkends="co.note.cmdfunc"/>
......
</programlisting>
<calloutlist>
<callout id="co.note.cmdfunc" arearefs="co.cmdfunc" >
<para>要读取数据,肯定是要先发送对应的读页(read page)的命令</para>
</callout>
</calloutlist>
</programlistingco>
详情参考【已解决】Docbook中的callout图片在programlisting中不显示 -> xsltproc不支持areaspec |
||||
|
3.38. |
An fo:block is wider than the available room in inline-progression-dimension |
|||
29, 2012 10:36:07 org.apache.fop.events.LoggingEventListener processEvent
An fo:block  (See position 668:2859) is wider than the available room in inline-progression-dimension. Adjusting end-indent based on overconstrained geometry rules (XSL 1.1, ch. 5.3.4)
29, 2012 10:36:07 org.apache.fop.events.LoggingEventListener processEvent
Line 1 of a paragraph overflows the available area by 4390 millipoints. (See position 668:2859)
29, 2012 10:36:08  org.apache.fop.layoutmgr.table.TableContentLayoutManager addAreas
 tablePositions empty. Please send your FO file to fop-users@xmlgraphics.apache.org
出现类似fo:block is wider than the available room in inline-progression-dimension的问题的话,从字面上就能看出,是block比inline宽,超过界限了 我之前遇到此问题,是在不熟悉quote的用法时,将属于block类型的table等内容,放到了属于inline类型的quote中,导致上面的问题的。 详情请参考:【已解决】Docbook生成的pdf中,当表格在quote中时,表格头部却在底端显示,而且如果内容是多行的,还会显示出多行 所以遇到此类问题的话,请自行去找找,是不是也误用了某些关键字,把属于block的东西,放到了属于inline中去了。 解决办法:找到误用的关键字,换成适当的关键字 |
||||
|
3.39. |
TransformerException: The column-number or number of cells in the row overflows the number of fo:table-columns specified for the table |
|||
javax.xml.transform.TransformerException: org.apache.fop.fo.ValidationException: The column-number or number of cells in the row overflows the number of fo:table-columns specified for the table. (See position 12:37135)
从字面上就能看出,是说明某个列数或者是单元格数目,超过了表格所定义的 比如我此处不小心写成的:
<table><title>USB 3.0的引脚定义</title>
    <tgroup cols="4">
...
        <tbody>
...
            <row><entry>Shell</entry><entry>Shell</entry><entry namest="col3" nameend="col5" >Shield</entry></row>
        </tbody>
    </tgroup>
</table>
即在tgroup中定义了cols列数为4,结果不小心在tbody中的某行,错写了某个entry,nameend为col5,超过了本身所定义的最多4列,因此才出现此错误。 解决办法:去对应表格中,仔细找找,肯定是有某处,不小心,写错了,导致列的书目或者是单元格的数目,超过了table的tgroup中所定义了列数了。 |
||||
|
3.40. |
如何通过xref(在别处)引用某个段落(para)? |
|||
|
可以给para添加一个包裹层,比如用tip包裹起来para,然后给tip添加id属性,然后就可以在别处引用此para了。 后来又知道了Docbook中还有个formalpara,即正式的段落,带标题的段落 如果想要实现段落引用,个人觉得使用formalpara效果会更好,这样,段落还可以带标题。 比如我后来就遇到一个情况,希望引用别处的某段代码,其是在某个para里面的,之前的做法是专门用tip给这段programlisting包裹起来,然后给tip添加id属性,然后在别处引用此源码,现在就可以把tip换成formalpara,然后给formalpara添加id属性,这样就方便别处引用此formalpara了 解决办法:使用formalpara,然后给formalpara添加id属性,即可在别处通过xref引用 |
||||
|
3.41. |
WARNING: Content overflows the viewport of the fo:region-body on page 9 in block-progression direction by 99828 millipoints. (See position 2:5700) |
|||
|
警告说是,有些的内容显示,溢出实际所定义的范围了 出现溢出的东西,有多种,有的是表格内的文字溢出单元格,有的是图片显示超过了当前页面等等,而使得显示出来的效果,超过了其可视范围(viewpoint) 此溢出问题,有些是无关紧要的,在显示出来的效果上,也看不出有啥异常。 有些则是显示出来的效果,的确有重叠,覆盖等问题。所以,要根据实际情况而定。 解决办法:当显示效果没啥异常的话,可以忽略此警告。如果显示效果的确有问题了,则需要去找到对应的代码的位置,进行微调,比如修改表格中单元格的宽度设置等,以避免内容溢出而导致的内容显示异常问题。 |
||||
|
3.42. |
PDF中callout不能点击跳转(而HTML中却可以) |
|||
|
原因是fo的xsl中co的配置,对于arearef没有正确添加对应的fo:basic-link的internal-destination,导致了生成的pdf中,callout图片不带链接,无法点击。而对应的HTML的xsl配置中,有对于arearef的处理,会生成对应的href,所以HTML中是callout是可以点击的。 解决方法:给fo的xsl中添加如下配置即可:
<!--============================================================================
callout setting
=============================================================================-->
<!-- from docbook-xsl-ns-1.76.1\fo\callout.xsl -->
<xsl:template match="d:co">
<!-- added by crifan start -->
<fo:inline>
<fo:basic-link>
<xsl:if test="@linkends">
<xsl:attribute name="internal-destination">
<xsl:value-of select="@linkends"/>
</xsl:attribute>
</xsl:if>
<!-- added by crifan end -->
<xsl:call-template name="anchor"/>
<xsl:apply-templates select="." mode="callout-bug"/>
<!-- added by crifan start -->
</fo:basic-link>
<!-- added by crifan end -->
</fo:inline>
</xsl:template>
<xsl:template match="d:coref">
<!-- tricky; this relies on the fact that we can process the "co" that's -->
<!-- "over there" as if it were "right here" -->
<xsl:variable name="co" select="key('id', @linkend)"/>
<xsl:choose>
<xsl:when test="not($co)">
<xsl:message>
<xsl:text>Error: coref link is broken: </xsl:text>
<xsl:value-of select="@linkend"/>
</xsl:message>
</xsl:when>
<xsl:when test="local-name($co) != 'co'">
<xsl:message>
<xsl:text>Error: coref doesn't point to a co: </xsl:text>
<xsl:value-of select="@linkend"/>
</xsl:message>
</xsl:when>
<xsl:otherwise>
<fo:inline>
<!-- added by crifan start -->
<fo:basic-link>
<xsl:if test="@linkend">
<xsl:attribute name="internal-destination">
<xsl:value-of select="@linkend"/>
</xsl:attribute>
</xsl:if>
<!-- added by crifan end -->
<xsl:call-template name="anchor"/>
<xsl:apply-templates select="$co" mode="callout-bug"/>
<!-- added by crifan start -->
</fo:basic-link>
<!-- added by crifan end -->
</fo:inline>
</xsl:otherwise>
</xsl:choose>
</xsl:template>
<!-- from docbook-xsl-ns-1.76.1\fo\lists.xsl -->
<xsl:template name="callout.arearef">
<xsl:param name="arearef"></xsl:param>
<xsl:variable name="targets" select="key('id',$arearef)"/>
<xsl:variable name="target" select="$targets[1]"/>
<xsl:choose>
<xsl:when test="count($target)=0">
<xsl:value-of select="$arearef"/>
<xsl:text>: ???</xsl:text>
</xsl:when>
<xsl:when test="local-name($target)='co'">
<!-- added by crifan start -->
<fo:basic-link>
<xsl:attribute name="internal-destination">
<xsl:value-of select="$arearef"/>
</xsl:attribute>
<!-- added by crifan end -->
<xsl:apply-templates select="$target" mode="callout-bug"/>
<!-- added by crifan start -->
</fo:basic-link>
<!-- added by crifan end -->
</xsl:when>
<xsl:when test="local-name($target)='areaset'">
<xsl:call-template name="callout-bug">
<xsl:with-param name="conum">
<xsl:apply-templates select="$target" mode="conumber"/>
</xsl:with-param>
</xsl:call-template>
</xsl:when>
<xsl:when test="local-name($target)='area'">
<xsl:choose>
<xsl:when test="$target/parent::d:areaset">
<xsl:call-template name="callout-bug">
<xsl:with-param name="conum">
<xsl:apply-templates select="$target/parent::d:areaset"
mode="conumber"/>
</xsl:with-param>
</xsl:call-template>
</xsl:when>
<xsl:otherwise>
<xsl:call-template name="callout-bug">
<xsl:with-param name="conum">
<xsl:apply-templates select="$target" mode="conumber"/>
</xsl:with-param>
</xsl:call-template>
</xsl:otherwise>
</xsl:choose>
</xsl:when>
<xsl:otherwise>
<xsl:text>???</xsl:text>
</xsl:otherwise>
</xsl:choose>
</xsl:template>
详情参考:【全部解决】Docbook生成的PDF中callout不能点击跳转(而HTML中却可以)
|
||||
|
3.43. |
callout图片在programlisting的源码中不显示 |
|||
|
callout图片,虽然可以在callout注释中显示,但是却在programlisting的源码中不显示。 其原因在于,xsltproc不支持areaspec,而官网对于programlistingco的例子中,却用的是areaspec,结果就是按照例子写出来的代码,用xsltproc生成的结果,callout图片在源码中不显示。 解决方法:不用arespec,改用co,放在programlisting的代码中具体的位置,即可。示例代码如下: 例 3.1. co用法示例
<programlistingco>
<programlisting language="c">
...
chip->cmdfunc(mtd, NAND_CMD_READ0, 0x00, page); <co id="co.cmdfunc" linkends="co.note.cmdfunc"/>
...
</programlisting>
<calloutlist>
<callout id="co.note.cmdfunc" arearefs="co.cmdfunc" >
<para>要读取数据,肯定是要先发送对应的读页(read page)的命令</para>
</callout>
</calloutlist>
</programlistingco>
详情参考:【已解决】Docbook中的callout图片在programlisting中不显示 -> xsltproc不支持areaspec |
||||
|
3.44. |
如何在(只使用co而没有使用areaspec的)源码中多个位置,指向同一个co(callout)? |
|||
|
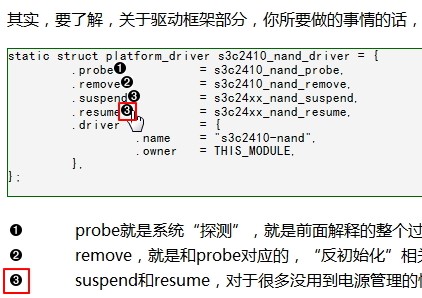
之前已经实现了源码中的callout,详见:【已解决】Docbook中的callout图片在programlisting中不显示 但是后来遇到的需求是,希望在源码中的多个位置,都设置同一个co 之前的临时性的办法是,使用linkends指向另一个co:
	.suspend<co id="co.suspend" linkends="co.note.suspend" />	= s3c24xx_nand_suspend,
	.resume<co linkends="co.note.suspend" />		= s3c24xx_nand_resume,
很明显,效果很不好。 后来无意间发现有个coref,发现正是我想要的,对应的用法如下: 例 3.2. coref用法示例
	.suspend<co id="co.suspend" linkends="co.note.suspend" />	= s3c24xx_nand_suspend,
	.resume<coref linkend="co.suspend" />		= s3c24xx_nand_resume,
生成的HTML中的效果,如下: 解决办法:使用coref,设置linkend属性值为某共同的co的id,即可 |
||||
|
3.45. |
新的docbook-xsl-ns-1.77.0生成的html中的revhistory中单元格无边框 |
|||
|
原因:新版的docbook-xsl-ns-1.77.0相对于旧版的docbook-xsl-ns-1.76.1,改变了 <xsl:template match="d:revhistory" mode="titlepage.mode"> 部分的设置,导致新的边框的属性的设置,只应用于整个表格,而单元格的边框没有设置。 解决办法:添加如下配置:
<!--============================================================================
revhistory table setting
=============================================================================-->
<!--
from docbook-xsl-ns-1.77.0\html\titlepage.xsl
has refer: http://www.w3school.com.cn/css/css_table.asp, but 'solid' not work
-->
<xsl:template match="d:revhistory" mode="titlepage.mode">
<xsl:variable name="numcols">
<xsl:choose>
<xsl:when test=".//d:authorinitials|.//d:author">3</xsl:when>
<xsl:otherwise>2</xsl:otherwise>
</xsl:choose>
</xsl:variable>
<xsl:variable name="id"><xsl:call-template name="object.id"/></xsl:variable>
<xsl:variable name="title">
<xsl:call-template name="gentext">
<xsl:with-param name="key">RevHistory</xsl:with-param>
</xsl:call-template>
</xsl:variable>
<xsl:variable name="contents">
<div>
<xsl:apply-templates select="." mode="common.html.attributes"/>
<xsl:call-template name="id.attribute"/>
<table>
<xsl:if test="$css.decoration != 0">
<!-- changed by crifan start -->
<!--
<xsl:attribute name="style">
<xsl:text>border-style:solid; width:100%;</xsl:text>
</xsl:attribute>
-->
<xsl:attribute name="border">
<xsl:text>1px solid black</xsl:text>
</xsl:attribute>
<xsl:attribute name="width">
<xsl:text>100%</xsl:text>
</xsl:attribute>
<!-- changed by crifan end -->
</xsl:if>
<!-- include summary attribute if not HTML5 -->
<xsl:if test="$div.element != 'section'">
<xsl:attribute name="summary">
<xsl:call-template name="gentext">
<xsl:with-param name="key">revhistory</xsl:with-param>
</xsl:call-template>
</xsl:attribute>
</xsl:if>
<tr>
<th align="{$direction.align.start}" valign="top" colspan="{$numcols}">
<b>
<xsl:call-template name="gentext">
<xsl:with-param name="key" select="'RevHistory'"/>
</xsl:call-template>
</b>
</th>
</tr>
<xsl:apply-templates mode="titlepage.mode">
<xsl:with-param name="numcols" select="$numcols"/>
</xsl:apply-templates>
</table>
</div>
</xsl:variable>
<xsl:choose>
<xsl:when test="$generate.revhistory.link != 0">
<!-- Compute name of revhistory file -->
<xsl:variable name="file">
<xsl:call-template name="ln.or.rh.filename">
<xsl:with-param name="is.ln" select="false()"/>
</xsl:call-template>
</xsl:variable>
<xsl:variable name="filename">
<xsl:call-template name="make-relative-filename">
<xsl:with-param name="base.dir" select="$chunk.base.dir"/>
<xsl:with-param name="base.name" select="$file"/>
</xsl:call-template>
</xsl:variable>
<a href="{$file}">
<xsl:copy-of select="$title"/>
</a>
<xsl:call-template name="write.chunk">
<xsl:with-param name="filename" select="$filename"/>
<xsl:with-param name="quiet" select="$chunk.quietly"/>
<xsl:with-param name="content">
<xsl:call-template name="user.preroot"/>
<html>
<head>
<xsl:call-template name="system.head.content"/>
<xsl:call-template name="head.content">
<xsl:with-param name="title">
<xsl:value-of select="$title"/>
<xsl:if test="../../d:title">
<xsl:value-of select="concat(' (', ../../d:title, ')')"/>
</xsl:if>
</xsl:with-param>
</xsl:call-template>
<xsl:call-template name="user.head.content"/>
</head>
<body>
<xsl:call-template name="body.attributes"/>
<xsl:copy-of select="$contents"/>
</body>
</html>
<xsl:text>
</xsl:text>
</xsl:with-param>
</xsl:call-template>
</xsl:when>
<xsl:otherwise>
<xsl:copy-of select="$contents"/>
</xsl:otherwise>
</xsl:choose>
</xsl:template>
|
||||
|
3.46. |
WARNING: Glyph "?" (0x21b5, carriagereturn) not available in font "MicrosoftYaHei". |
|||
|
原因:某些个人的特殊字符,此处为Unicode值为0x21b5的特殊的回车键形状的字符:↵,对应的字体无法显示,所以报错。 解决办法:给该特殊字符添加role="xxx",其中xxx为别的某种类型的字体。比如,将原先的源码:
<para>回车(↵)后再输入:</para>
改为:
<para>回车(<phrase role="symbol">↵</phrase>)后再输入:</para>
|
||||
|
3.47. |
如何实现给table中(多个)特定位置添加相应的注释? |
|||
|
有两种办法:
|
|
|
|
|
| 2.8. Docbook环境进化过程简单记录 |  |
第 4 章 Docbook参考资料 |


![[注意]](http://www.crifan.com/files/res/docbook/images/note.png)
![[提示]](http://www.crifan.com/files/res/docbook/images/tip.png)