折腾:
【已解决】阿里云万网中如何设置二级域名指向另一台服务器
期间,已经实现:
会转发到:
新服务器:
但是其实更加需要实现:
可以转发到:
以及考虑到长远需求,最好的是实现:
即根据后面的url部分不同,转发不同的端口:
因为后续被转发的服务器上要实现多个系统的多套api,端口是不同的。
【无法解决】阿里云中尝试用显示URL或隐式URL实现二级域名转发中的端口转发
“<virtualhost *:80> ServerName exp.xiaogd.net ProxyPassMatch ^/(.*)$ http://127.0.0.1:8080/$1</virtualhost>”
还可以用$1把剩余url获取到呢
看来都只能是去被转发到的目标服务器中配置规则
“用 nginx 端口转发不就 ok
DNS 解析到服务器,然后在用 nginx 根据不同的域名做端口转发”
还可以根据不同域名转发不同端口
-》那么就可以实现:
story.xxx -》 绘本的api的端口
evaluate.xxx.com ->评测的api的端口了
二级域名 转发 端口 nginx
才注意到:
中,要修改的服务器是:
转发前的服务器,去添加nginx配置
其中:
server {
  listen 80; #监听的端口
  server_name jira.ueionline.com; #监听的域名
  location / {
  proxy_redirect off;
  proxy_set_header Host $host;
  proxy_set_header X-Real-IP $remote_addr;
  proxy_set_header X-Forwarded-For $proxy_add_x_forwarded_for;
  proxy_pass http://101.200.172.108:9090; #跳转的url和接口
  }
  access_log logs/jira_access.log; #生成的日志,只需修改:jira_access.log,文件自动生成。
}
好像可以通过:
把:
location /
改为:
location /storybook
即可实现不同子路径,转发到不同的地址中的不同的端口了。
- location /storybook -> xxx:33800
- location /evaluate -> xxx:OHTER_PORT
也可以参考:
server {
        listen       80;
        server_name  *.abc.com;
        if ($http_host ~* "^(.*?)\.abc\.com$") {    #正则表达式
                set $domain $1;                     #设置变量
        }
        location / {
            if ($domain ~* "shop") {
               proxy_pass http://abc.com:3001;      #域名中有shop,转发到3001端口
            }
            if ($domain ~* "mail") {
               proxy_pass http://abc.com:3002;      #域名中有mail,转发到3002端口
            }
            tcp_nodelay     on;
            proxy_set_header Host            $host;
            proxy_set_header X-Real-IP       $remote_addr;
            proxy_set_header X-Forwarded-For $proxy_add_x_forwarded_for;
            #以上三行,目的是将代理服务器收到的用户的信息传到真实服务器上

            root   html;
            index  index.html index.htm;            #默认情况
        }
}
去额外判断domain的值
以及子url的值
去登录带域名的服务器中去配置试试
去看看配置文件在哪里:
[root@xxx ~]# nginx --help
nginx: invalid option: "-"
[root@xxx ~]# nginx -h
nginx version: nginx/1.12.2
Usage: nginx [-?hvVtTq] [-s signal] [-c filename] [-p prefix] [-g directives]

Options:
  -?,-h         : this help
  -v            : show version and exit
  -V            : show version and configure options then exit
  -t            : test configuration and exit
  -T            : test configuration, dump it and exit
  -q            : suppress non-error messages during configuration testing
  -s signal     : send signal to a master process: stop, quit, reopen, reload
  -p prefix     : set prefix path (default: /www/server/nginx/)
  -c filename   : set configuration file (default: conf/nginx.conf)
  -g directives : set global directives out of configuration file

[root@xxx ~]# nginx -v
nginx version: nginx/1.12.2
[root@xxx ~]# nginx -V
nginx version: nginx/1.12.2
built by gcc 4.8.5 20150623 (Red Hat 4.8.5-16) (GCC)
built with OpenSSL 1.0.2l  25 May 2017
TLS SNI support enabled
configure arguments: --user=www --group=www --prefix=/www/server/nginx --with-openssl=/www/server/nginx/src/openssl --add-module=/www/server/nginx/src/ngx_devel_kit --add-module=/www/server/nginx/src/lua_nginx_module --add-module=/www/server/nginx/src/ngx_cache_purge --with-http_stub_status_module --with-http_ssl_module --with-http_v2_module --with-http_gzip_static_module --with-http_gunzip_module --with-stream --with-stream_ssl_module --with-ipv6 --with-http_sub_module --with-http_flv_module --with-http_addition_module --with-http_realip_module --with-http_mp4_module --with-ld-opt=-Wl,-E
[root@xxx ~]# nginx -c
nginx: option "-c" requires file name
[root@xxx ~]# nginx -t
nginx: the configuration file /www/server/nginx/conf/nginx.conf syntax is ok
nginx: configuration file /www/server/nginx/conf/nginx.conf test is successful
[root@xxx ~]#
然后去打开:
/www/server/nginx/conf/nginx.conf
然后大概理解了,需要自己新建一个:
然后再去设置里面的参数。
【已解决】实现二级域名端口转发需要配置nginx的哪些参数以及如何配置
然后自己去配置为:
server
{
    listen 80;
    server_name dev.xxx;

    access_log  /www/wwwlogs/dev.xxx.log;

    proxy_set_header HOST $host;
    proxy_set_header X-Forwarded-Proto $scheme;
    proxy_set_Header X-Real-IP $remote_addr;
    proxy_set_header X-Forwarded-For $proxy_add_x_forwarded_for;

    location /storybook/
    {
        # proxy_redirect off;
        # proxy_pass http://xxx:33800;
        proxy_pass http://xxx:33800/;
    }

}
保存为:
注意到:
nginx.conf
include /www/server/panel/vhost/nginx/*.conf;
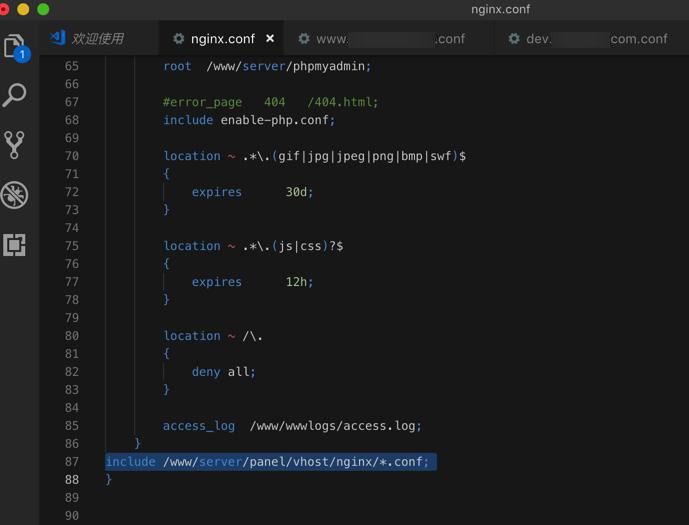
所以去把此处的:
dev.xxx.conf
放到
/www/server/panel/vhost/nginx/
中:
[root@xxx nginx]# pwd
/www/server/panel/vhost/nginx
[root@xxx nginx]# ll
total 12
-rw------- 1 root root 1370 Mar 15  2018 phpfpm_status.conf
-rw-r--r-- 1 root root  544 Mar 15  2018 phpinfo.conf
-rw-r--r-- 1 root root 1206 Mar 15  2018 www.xxx.conf
[root@xxx nginx]# rz
rz waiting to receive.
Starting zmodem transfer.  Press Ctrl+C to cancel.
Transferring dev.xxx.conf...
  100%     471 bytes  471 bytes/sec 00:00:01       0 Errors

[root@xxx nginx]# ll
total 16
-rw-r--r-- 1 root root  471 Nov 19 15:27 dev.xxx.conf
-rw------- 1 root root 1370 Mar 15  2018 phpfpm_status.conf
-rw-r--r-- 1 root root  544 Mar 15  2018 phpinfo.conf
-rw-r--r-- 1 root root 1206 Mar 15  2018 www.xxx.conf
然后重新加载nginx,结果报错:
【已解决】nginx重启出错:Stoping nginx emerg unknown directive in
后来结果又出现其他的错了:
【不去解决】systemctl restart nginx出错:Unit nginx.service entered failed state Unregistered Authentication Agent for unix-process
【已解决】nginx配置正确但是却始终无法实现二级域名的端口转发效果
去此处的,被转发的,目标服务器:dev服务器
[root@xxx-general-01 ~]# nginx -t
nginx: the configuration file /etc/nginx/nginx.conf syntax is ok
nginx: configuration file /etc/nginx/nginx.conf test is successful
找到nginx的配置路径:
/etc/nginx/nginx.conf
去看看配置:
[root@xxx-general-01 ~]# cd /etc/nginx/
[root@xxx-general-01 nginx]# ll
total 72
drwxr-xr-x 2 root root 4096 May  2  2018 conf.d
drwxr-xr-x 2 root root 4096 Jun 23 11:30 default.d
-rw-r--r-- 1 root root 1077 Mar  6  2018 fastcgi.conf
-rw-r--r-- 1 root root 1077 Mar  6  2018 fastcgi.conf.default
-rw-r--r-- 1 root root 1007 Mar  6  2018 fastcgi_params
-rw-r--r-- 1 root root 1007 Mar  6  2018 fastcgi_params.default
-rw-r--r-- 1 root root 2837 Mar  6  2018 koi-utf
-rw-r--r-- 1 root root 2223 Mar  6  2018 koi-win
-rw-r--r-- 1 root root 3957 Mar  6  2018 mime.types
-rw-r--r-- 1 root root 3957 Mar  6  2018 mime.types.default
-rw-r--r-- 1 root root 3690 Jul  2 16:47 nginx.conf
-rw-r--r-- 1 root root 2656 Mar  6  2018 nginx.conf.default
-rw-r--r-- 1 root root  180 Jun 23 11:34 proxy_params
-rw-r--r-- 1 root root  636 Mar  6  2018 scgi_params
-rw-r--r-- 1 root root  636 Mar  6  2018 scgi_params.default
-rw-r--r-- 1 root root  664 Mar  6  2018 uwsgi_params
-rw-r--r-- 1 root root  664 Mar  6  2018 uwsgi_params.default
-rw-r--r-- 1 root root 3610 Mar  6  2018 win-utf
[root@xxx-general-01 nginx]# cd conf.d/
[root@xxx-general-01 conf.d]# ll
total 0
看到配置:
[root@xxx-general-01 conf.d]# cd ..
[root@xxx-general-01 nginx]# cat nginx.conf
# For more information on configuration, see:
#   * Official English Documentation: http://nginx.org/en/docs/
#   * Official Russian Documentation: http://nginx.org/ru/docs/

user nginx;
worker_processes auto;
error_log /var/log/nginx/error.log;
pid /run/nginx.pid;

# Load dynamic modules. See /usr/share/nginx/README.dynamic.
include /usr/share/nginx/modules/*.conf;

events {
    worker_connections 1024;
}

http {
    log_format  main  '$remote_addr - $remote_user [$time_local] "$request" '
                      '$status $body_bytes_sent "$http_referer" '
                      '"$http_user_agent" "$http_x_forwarded_for"';

    access_log  /var/log/nginx/access.log  main;

    sendfile            on;
    tcp_nopush          on;
    tcp_nodelay         on;
    keepalive_timeout   65;
    types_hash_max_size 2048;

    include             /etc/nginx/mime.types;
    default_type        application/octet-stream;

    # Load modular configuration files from the /etc/nginx/conf.d directory.
    # See http://nginx.org/en/docs/ngx_core_module.html#include
    # for more information.
    include /etc/nginx/conf.d/*.conf;

    server {
        listen       80 default_server;
        listen       [::]:80 default_server;
        server_name  _;
        # root         /usr/share/nginx/html;
        root         /root/xxx_20180101/web/www;

        # Load configuration files for the default server block.
        include /etc/nginx/default.d/*.conf;

        location / {
            add_header Access-Control-Allow-Origin *;
            add_header Access-Control-Allow-Methods 'GET, POST, OPTIONS';
            add_header Access-Control-Allow-Headers 'DNT,X-Mx-ReqToken,Keep-Alive,User-Agent,X-Requested-With,If-Modified-Since,Cache-Control,Content-Type,Authorization';

            if ($request_method = 'OPTIONS') {
                return 204;
            }
        }

        error_page 404 /404.html;
            location = /40x.html {
        }

        error_page 500 502 503 504 /50x.html;
            location = /50x.html {
        }
    }
...
}
其中可见:
在第一个location之前,用了:
include /etc/nginx/default.d/*.conf;
所以可以把配置加到
/etc/nginx/default.d/dev.xxx.conf
并且修复log路径,实现建立一个
/var/log/nginx/dev.xxx/
目录后,再去加上配置:
server
{
    listen 80;
    server_name dev.xxx;

    access_log  /var/log/nginx/dev.xxx/access.log;
    error_log   /var/log/nginx/dev.xxx/error.log;

    proxy_set_header HOST $host;
    proxy_set_header X-Forwarded-Proto $scheme;
    proxy_set_header X-Real-IP $remote_addr;
    proxy_set_header X-Forwarded-For $proxy_add_x_forwarded_for;
    proxy_http_version 1.1;

    location /storybook/
    {
        # proxy_redirect off;

        # proxy_pass http://xxx:33800;
        proxy_pass http://xxx:33800/;
    }

}
然后再去:
[root@xxx-general-01 conf.d]# systemctl stop nginx
[root@xxx-general-01 conf.d]# systemctl start nginx
[root@xxx-general-01 conf.d]# systemctl status nginx
● nginx.service - The nginx HTTP and reverse proxy server
   Loaded: loaded (/usr/lib/systemd/system/nginx.service; enabled; vendor preset: disabled)
   Active: active (running) since Mon 2018-11-19 17:10:17 CST; 4s ago
  Process: 15738 ExecStart=/usr/sbin/nginx (code=exited, status=0/SUCCESS)
  Process: 15734 ExecStartPre=/usr/sbin/nginx -t (code=exited, status=0/SUCCESS)
  Process: 15732 ExecStartPre=/usr/bin/rm -f /run/nginx.pid (code=exited, status=0/SUCCESS)
Main PID: 15740 (nginx)
   CGroup: /system.slice/nginx.service
           ├─15740 nginx: master process /usr/sbin/nginx
           ├─15741 nginx: worker process
           ├─15742 nginx: worker process
           ├─15743 nginx: worker process
           └─15744 nginx: worker process

Nov 19 17:10:17 xxx-general-01 systemd[1]: Starting The nginx HTTP and reverse proxy server...
Nov 19 17:10:17 xxx-general-01 nginx[15734]: nginx: the configuration file /etc/nginx/nginx.conf syntax is ok
Nov 19 17:10:17 xxx-general-01 nginx[15734]: nginx: configuration file /etc/nginx/nginx.conf test is successful
Nov 19 17:10:17 xxx-general-01 systemd[1]: Started The nginx HTTP and reverse proxy server.
再去看看效果如何

说明跳转正常了。
然后访问:
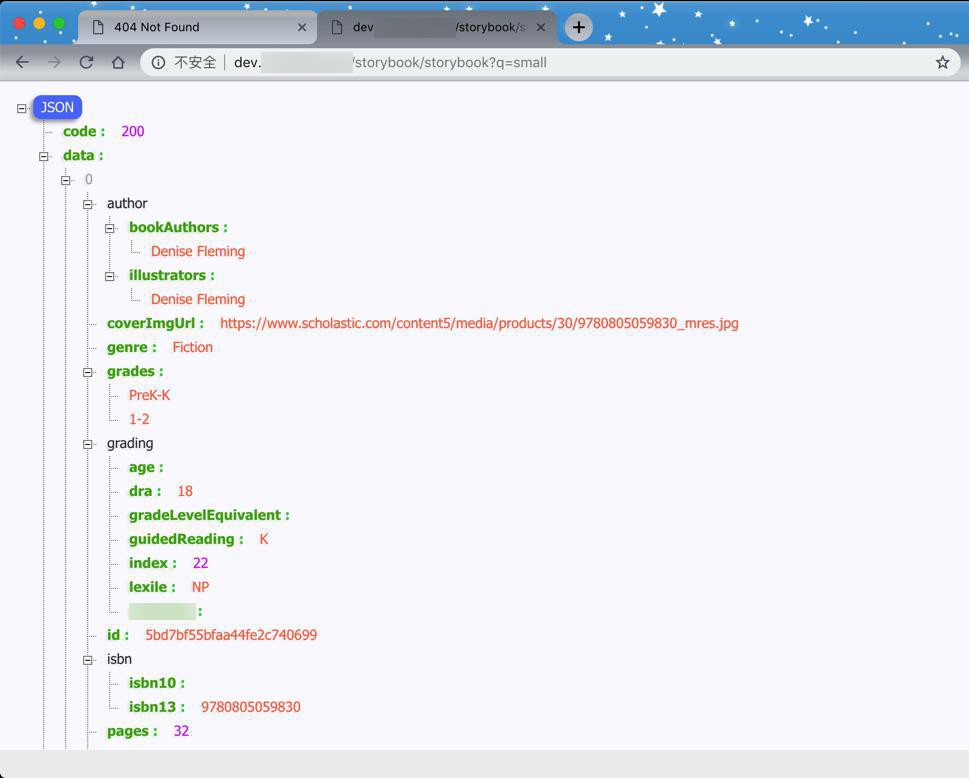
也就可以正常获取数据了。
再去试试另外一个api:
之前是:
现在是:
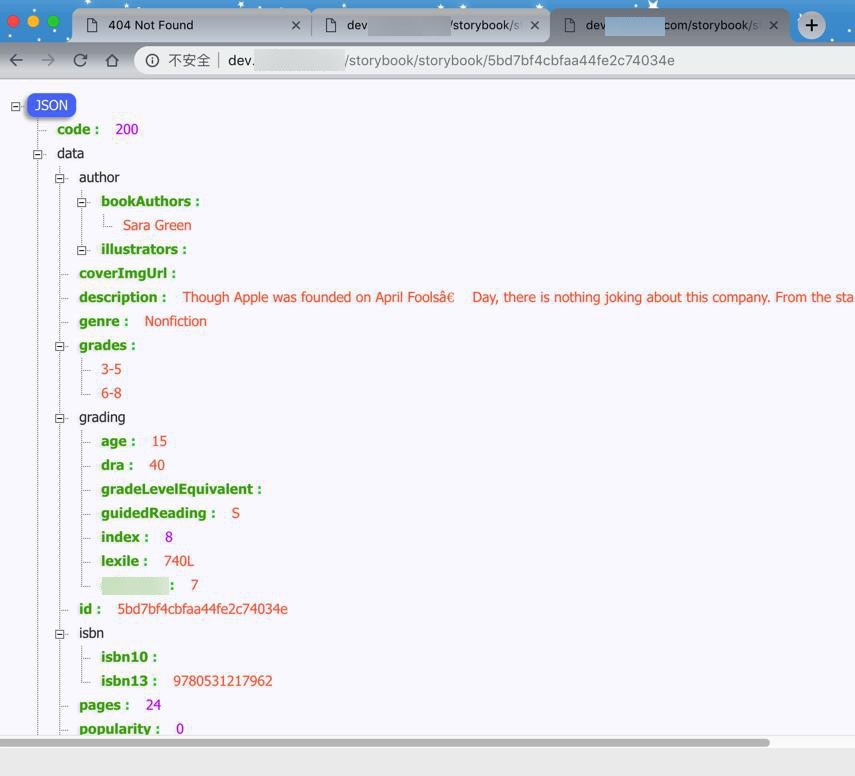
也是可以的。
【总结】
先要实现:
以及考虑到长远需求,最好的也支持其他不同端口的转发:
最后是通过配置nginx实现此端口转发的功能的。
具体做法是:
在被转发过去的,目标服务器xxx中,
看到本身已有nginx配置:
/etc/nginx/nginx.conf
http {
    # Load modular configuration files from the /etc/nginx/conf.d directory.
    # See
http://nginx.org/en/docs/ngx_core_module.html#include
    # for more information.
    include /etc/nginx/conf.d/*.conf;
}
所以去新增:
/etc/nginx/conf.d/dev.xxx.conf
server
{
    listen 80;
    server_name
dev.xxx;

    access_log  /var/log/nginx/
dev.xxx/access.log;
    error_log   /var/log/nginx/
dev.xxx/error.log;

    proxy_set_header HOST $host;
    proxy_set_header X-Forwarded-Proto $scheme;
    proxy_set_header X-Real-IP $remote_addr;
    proxy_set_header X-Forwarded-For $proxy_add_x_forwarded_for;
    proxy_http_version 1.1;

    location /storybook/
    {
        # proxy_redirect off;

        # proxy_pass
http://xxx:33800;
        proxy_pass
http://xxx:33800/;
    }

}
即可实现完整的逻辑:
中的地址:
时,首先会被DNS域名解析到:
xxx
(这部分是由于阿里云中二级域名的设置所起到的效果)
2.然后由于被转发的目标服务器 xxx 的nginx的配置了:
server
{
    listen 80;
    server_name
dev.xxx;
...
   location /storybook/
    {
        proxy_pass
http://xxx:33800/;
    }
}从而把server_name来自于dev.xxx的请求,匹配了:/storybook/之后,通过proxy_pass的设置,转发给http://xxx:33800/
即自己服务器本身的另外某个端口 -》这个才是后台的真正的api的地址,从而返回对应有效的数据。
即实现了:
- 访问的是:
- 通过xxx 的nginx的配置,把匹配到的:
- 转发到:
- 最终实际上转发到了:
转载请注明:在路上 » 【已解决】阿里云中二级域名转发中如何实现端口转发